Learn in this article How to Master Lightroom Classic to Photoshop RAW Workflow.
When you send a RAW file from Lightroom Classic to Photoshop, Lightroom does not send the untouched RAW data. Instead, it first processes your Develop settings and hands the image off to Photoshop as a high-bit-depth TIFF or PSD file—a format designed for pixel-level editing.
Understanding this workflow is essential for maintaining maximum image quality, choosing the right file format, and keeping your edits organized and non-destructive.
This guide explains exactly what happens under the hood, how to optimize your External Editing Preferences, and the best workflow for combining Lightroom and Photoshop effectively.
What Actually Happens When You Edit a RAW File in Photoshop Through Lightroom Classic:
1. It’s Not a RAW File Anymore
When you choose Edit In → Adobe Photoshop, Lightroom applies all your Develop module adjustments (exposure, white balance, color, sharpening, etc.) and creates a new rendered file—TIFF or PSD.
This file includes your Lightroom edits baked in, allowing Photoshop to perform raster-based edits such as:
Layers
Cloning & healing
Frequency separation
Compositing
The RAW file stays saved and untouched in your catalog.
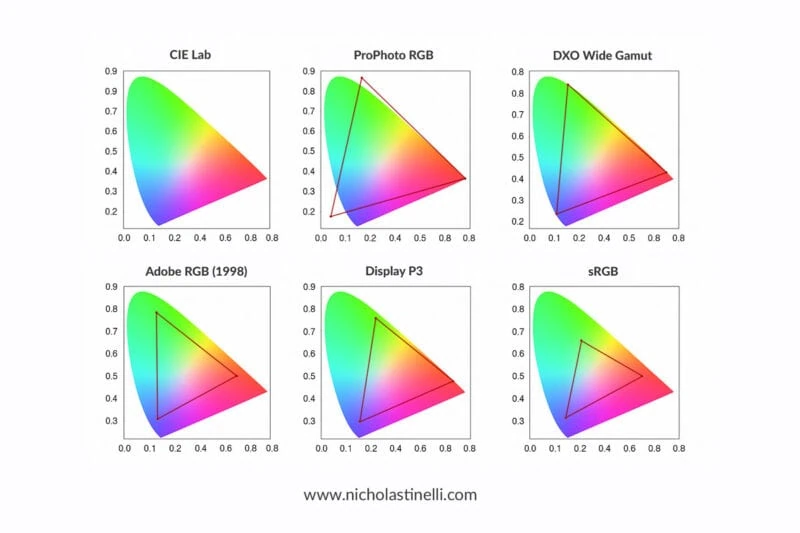
2. Lightroom’s Default Is a 16-bit TIFF in ProPhoto RGB
By default, Lightroom Classic exports the file as a:
TIFF
16-bit
ProPhoto RGB color space
This combination offers:
Maximum color depth
Wide color gamut
Excellent compatibility
According to Adobe’s documentation and widely-used professional workflows, this is the safest, highest-quality way to move files from Lightroom to Photoshop.
3. TIFF vs. PSD: Which Format Should You Use?
Choosing TIFF or PSD in Lightroom’s External Editing Preferences depends on your workflow.
TIFF
Best for photographers wanting:
Broader compatibility across editing software
Lossless compression options (ZIP)
Slightly smaller file sizes
Long-term archival stability
PSD
Best when:
You work heavily inside Photoshop
You want tight integration with Photoshop-only features
You rely on many complex layers
Both formats preserve layers, 16-bit color, and ProPhoto RGB.
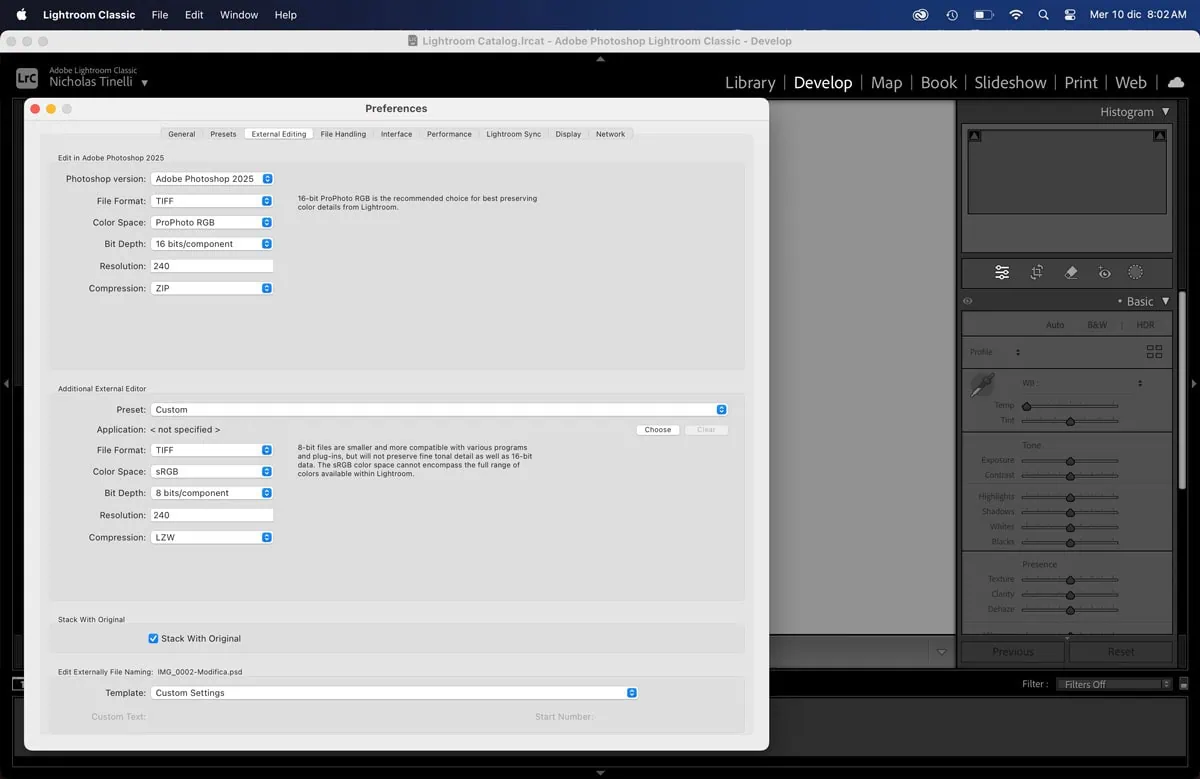
4. How to Customize External Editing Preferences in Lightroom Classic
To ensure maximum image quality and a smooth workflow:
Where to find the settings
macOS: Lightroom Classic > Preferences > External Editing
Windows: Edit > Preferences > External Editing
Recommended Settings
File Format: TIFF
Color Space: ProPhoto RGB
Bit Depth: 16 bits/component
Resolution: 240–300 ppi
Compression (TIFF only): ZIP
These settings guarantee optimal image quality when passing files to Photoshop.
5. Recommended Lightroom Classic RAW Workflow to Photoshop
1. Start with RAW Processing in Lightroom
Use the Develop module to adjust:
Exposure & contrast
White balance
Color grading
Lens corrections
Noise reduction
Basic retouching
2. Send to Photoshop
Right-click the image → Edit In → Adobe Photoshop
(or use Cmd/Ctrl+E).
Lightroom renders the file according to your External Editing preferences.
3. Perform Pixel-Level Editing in Photoshop
This is where Photoshop excels:
Advanced cleanup
Compositing
Skin retouching
Complex masking
Dodging & burning
Creative layer work
4. Save and Return to Lightroom
Just press Ctrl+S (Windows) / Cmd+S (Mac).
Photoshop saves the TIFF/PSD in the same folder as the RAW file, and Lightroom automatically imports it into the catalog—stacked with your original RAW.
6. Why This Workflow Is Non-Destructive
Your RAW file stays untouched in Lightroom.
Lightroom applies only metadata-based edits.
Photoshop edits go into a separate TIFF/PSD.
All versions stay linked and organized in your catalog.
This ensures maximum flexibility and reversibility throughout your post-production process.
7. Lightroom Classic to Photoshop RAW Workflow: Conclusions
Understanding how Lightroom Classic and Photoshop work together is essential for maintaining maximum image quality and building an efficient, non-destructive editing workflow.
By configuring your External Editing Preferences correctly and knowing when to use TIFF or PSD, you can move seamlessly between RAW processing in Lightroom and advanced pixel editing in Photoshop.
This approach gives you the best of both worlds: Lightroom’s powerful, non-destructive adjustments and Photoshop’s unmatched precision for retouching and compositing. With the right workflow in place, your edits remain organized, consistent, and optimized for professional results every time.