
Did you know that if the pages of your site take more than 3 seconds to load the user loses interest and leaves?
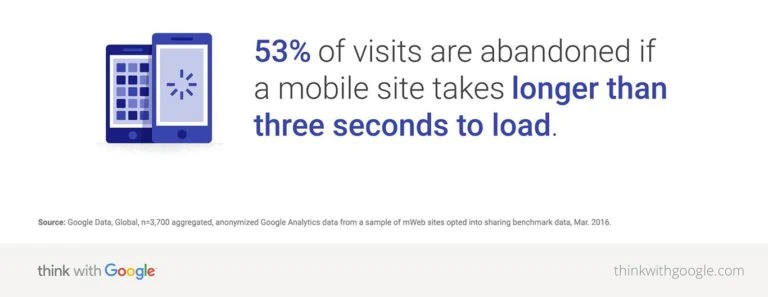
More loading time ——>> Less customers ——>> Less revenue for your business
In the following article, I will explain to you how to optimize images for the web with Photoshop and why it is so important for your site.
Images are one of the elements that most slow down the loading speed on the Internet.
So the question comes spontaneously: can I do without?
No. According to a research study, more than 80% of people are inclined to read content if it presents images and 64% will have a greater memory of what they have read.
The only solution is good optimization!
After a lot of work to build your site and consolidate your idea, between the choice of hosting, the structure, and the texts to be inserted, I’m sure that you will not want to go wrong right here, inserting heavy images, which will worsen the user experience.
This is even truer if you are a photographer and the images represent an important portion of your site.
Just think about yourself:
Don’t you lose patience when a site takes too long to load? I’m sure you do!
The same happens to your visitors!!

You’ll have to keep the quality high and reduce the weight considerably.
What benefits will you get with good optimization?
1. It will improve the loading of your site’s pages with happy visitors who will have quick access to your content;

2. With lighter files, you will see an improvement in SEO (Search Engine Optimization).
Google’s algorithm tends to position lighter images sooner and better, and search engines generally prefer sites that are light and fast to load.
3. Faster backups and less space occupied on the server. The choice of hosting will also affect the performance of the site.
Do you know what is the loading time of your site?
You can check it with some of the free tools available on the web:
2. Page Weight
3. GTmetrix
4. Pingdom
6. Varvy
That said, it is important to keep in mind what is the ideal weight and resolution for a web image: between 80 and 400 KB, with a standard resolution of 72 PPI (pixels per inch).
Remember that each image is different and some, higher quality, with detailed texture and many colors, will be more difficult to reduce.
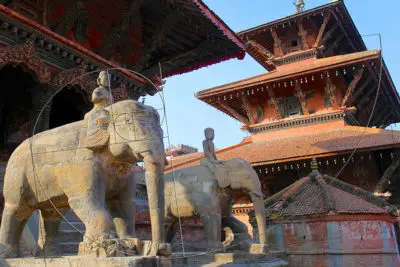
The measurements will depend on the final use of the image. For example, the cover picture on the homepage of my site has a larger pixel size than one that I placed in the illustration box of the services (photo below).
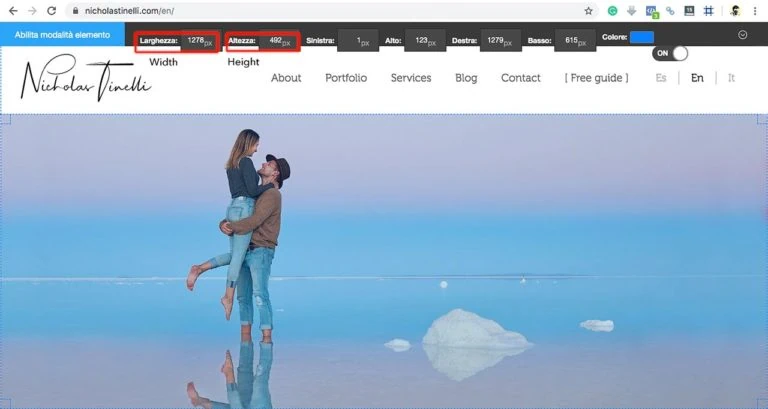
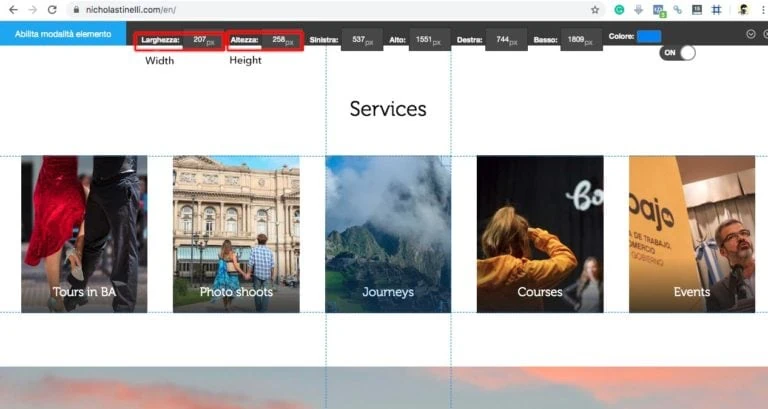
The Chrome Page Ruler extension, which I used for the example above, can help you understand and choose the size of the elements on a web page, making your work easier.
Once the theoretical part has been clarified, let’s move on to the practical:
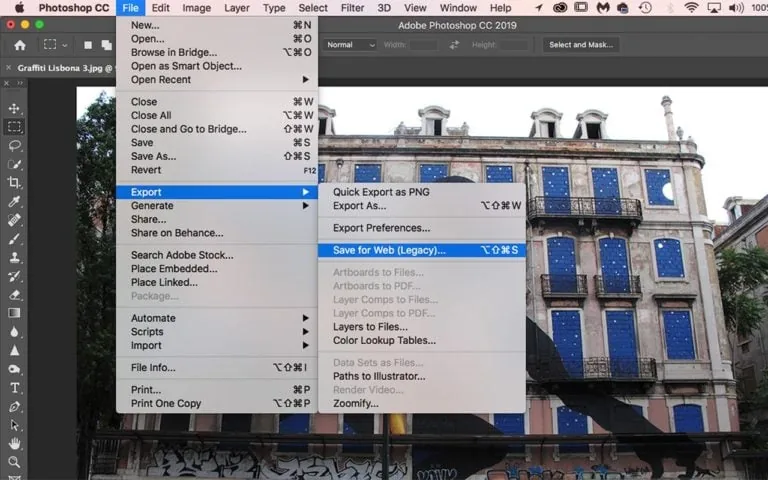
How to optimize images for the web with Photoshop without losing quality?
Use the tool “Save to web”.
You will find it in the upper menu, under the item:
File ——>> Export ——>> Save for Web (Legacy)
A window will open where you will see different options:
– Choice of format (JPEG);
– Image quality, from 0 to 100. A value that will affect weight and quality. In general, I apply a value between 40 and 60. Below 40 in most cases the loss of detail and color degradation is evident;
– Progressive (allows the progressive loading of the image on the web page);
– Embed color profile: check yes;
– Convert to sRGB (This is the ideal color space for web use. Be careful not to check the box if the image is already in sRGB);
– Possibility to choose which metadata to insert. This information may include copyright, where, when, and with what values the photograph was taken.
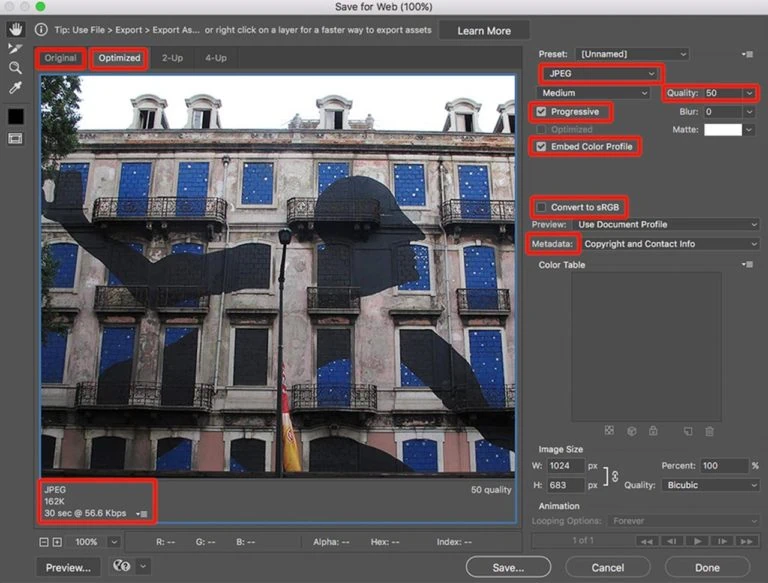
On the side, you will see the previews of the image: the original and the final version, with the dimensions below.
Once you have chosen the values, all you have to do is save the image and rename it with its main keywords, ready to be uploaded to the web. Google also searches for keywords in the description of the image, as well as in the ALT text. If you enter them correctly, as in the example down here, you will favor the SEO positioning of your images in search engines.

Not satisfied yet? Do you have a WordPress site and want to further reduce your files by 5-10%?
You can try using some compression plugins like Imagify, Smush Images Optimization, or Short Pixel.
Ideally, images should also be served in WebP format using one of these WordPress plugins. WebP is now supported by most web browsers.
Tip: Don’t over-compress, excessive use can negatively affect the image and deteriorate its colors. A very important detail, especially if you work in the field of photography.
Being able to optimize images for the web with Photoshop or other tools of your choice is essential to make the website fast and functional. You can reduce the size of your files yourself, or you can rely on a competent developer to take into account these aspects, which are crucial for search engines and the user experience on your site, as well as the growth of your business.
If you are interested in deepening your knowledge of Photoshop, you can take a look at my training proposal. If you have questions about it or the article, you can write to me in the comments below or through the contact form.


4 thoughts on “How to optimize images for the web with Photoshop”
Great article thank you for sharing
I’m glad it was helpful!! 😉
I never knew someone could write an article with such clarity and dexterity that the online websites demand these days. SEO and optimization have become so much important that the writers these days are bound within a timeframe. Amidst all such pressure, coming up with such a nice article is indeed incredible. Thanks to the writer of this post as he or she has done a really great job.
Thanks Gopi! I always put a lot of effort into what I write.